Harvesting the Bulb of Harvests
Jump to navigation
Jump to search
| Verified This page has been verified to match the content available on Levistras. |
| Walkthrough & Notes Dungeons & Maps Rewards Images Dialog Update History |
| Harvesting the Bulb of Harvests | |
|---|---|
| Required Level: | 150 |
| Type: | Fellowship |
| Starts With: | Adrenkus |
| Starts At: | Valley of Death at 37.6S, 62.2W |
| Repeat: | 20 Hours |
| Contracts: | Contract for Second Sister |
| Quest Chain: | 1. Releasing the Light 2. Harvesting the Bulb of Mornings 3. Harvesting the Bulb of Harvests 4. Harvesting the Bulb of Twilight 5. Hoshino Must Die |
Overview
- Tip: It is recommended that if you have less than 600 buffed jump skill, that you bring a jump rare to make the second set of jumps much easier
- Prerequisites
- You must have completed the previous quests: Releasing the Light, and Harvesting the Bulb of Mornings in order to start this quest.
- This quest flags you for the next one, Harvesting the Bulb of Twilight
Walkthrough & Notes
- Talk to Adrenkus in the Valley of Death at 37.6S 62.2W to start the quest. He is in the Temple of Harvests, which is a cave-like hole in the ground, in the first room on the left (south)
- Note: In this chain of the Bulb quests, you will be fighting Emergent Gromnies, as well as Verdant Moars/Moarsmen.
- Follow the tunnels and take the third passage on the right to reach the Sanctum Guardian Spirit. Talk to him to be portaled to the next section.
- Take the right passage from the start, and make your way down until you are able to take a turn SOUTH.
- You will come to a room with 2 platforms with a floor of spikes beneath it. Jump across and continue on.
- First jump is a half-power jump to the platform halfway the E way
- Full power jump to the W
- Just-over-half power jump to the exit
- Note: If you fall move SLOWLY to the north hall. The spikes do damage based on movement so be patient.
- Note: From the north hallway, head west and then take the first hallway going south to get back to the jumps
- Eventually you will come to a room with platforms/jumps. Make your way to the top and loot the Enchanted Seedling, then continue on through the hallway up top. If you fall into the pit with the vines don't run around because they do damage when you move around in them. Instead you have to jump over them to get to where you can get to a platform to get out of the pit.
- Recommended Path for the jumps (assumes 600+ jump skill)
- Stand in the NW corner of the main platform, and face the west wall. Hold spacebar (full) > hold shift > hold C > release spacebar > land on 1st platform
- On the first platform, again stand in the north west corner, and face the west wall. Hold spacebar (full) > hold C > release spacebar > land on 2nd platform
- On the second platform, stand halfway between the north and south end of the platform, and face north. Hold spacebar (full) > hold up arrow > release spacebar > land on 3rd platform
- On the 3rd platform look diagonally towards the east wall at the long platform (2nd from the left). Aim for the left side of the platform which you are looking at. Hold spacebar (full) > hold up arrow > release spacebar > land on 4th platform
- From the 4th platform look straight across to the west platform with the Enchanted Seedling on it. Hold Spacebar (full) > hold up arrow > release spacebar > land on 5th platform
- From the 5th platform face back to the west and make another full power back to the platform you just came from. Hold spacebar (full) > hold up arrow > release space > Land back on the 4th (now 6th) platform
- On the 4th/6th platform, stand in the south east corner and face the east wall. Hold spacebar (full) > hold C key > release spacebar > land on 7th platform
- On the 7th platform face diagonally to the south towards the door/hallway. This is a very quick tap-jump forward. Not much power is needed at all. It is recommended to aim for the left side of the hallway, as if you bounce it will give you room to spare.
- Alternative Path for the jumps (assumes 560 jump skill, can be done with 525 and a lot of jumping skills)
- From the base platform, stand on the far left side, just a bit from the ledge, and do a full shift-jump forward
- From this 2nd platform, face SE and do a full jump towards the platform in the corner
- stand near the wall on the edge, and a full shift jump to the W, towards a platform halfway the S wall
- from here, stand on the corner and a half power NNW towards a platform halfway the room on the W wall
- stand in the middle of the platform, and do a full power jump N towards the platform in the NW corner
- 6th jump: full jump from the corner towards the platform halfway the E wall
- 7th jump: just-a-bit-more-than-a-tap jump to the platform in the middle of the room
- Full jump towards the hallway
- You will come to an area with Bloodroot Vines. Collect 15 of the red Bloodroot Vines. The yellow Bloodroot Vines will simply disappear in a ring spell, acid vuln, or void DOT spell. The red colored ones are able to be picked up. Running or walking through the vines does frequent damage (between 40 and 70 per hit), avoid the vines except when you need to pick them up and definitely don't fight the creatures in the middle of a patch of vines.
- When you have 15, continue east until you reach the Bulb of Harvests and use it for a Seed of Essence.
- Head back to Adrenkus to hand in the Seed and claim your reward.
- Note: There is no surface portal but you can run back through the dungeon to the jumping puzzle room and use the surface portal in the pit (you can jump down straight into it). Otherwise you have to run back through the whole VoD so backtracking through the dungeon is faster.
- Note: Upon handing, you will be portaled to the Neftet Treasury with chests you can use your Legendary Key on.
- Optional: If you don't want your orb, you can hand it to Calitoth for some xp and luminance instead.
Dungeons & Maps
| Dungeon | Coordinates | Wiki Map | ACmaps |
|---|---|---|---|
| Adrenkus Cave | 37.6S, 62.2W | -- |
Rewards
| Experience: | 198,157,237 (??% up to level ??) |
| Luminance: | 20,000 |
| Items: | |
| Give Legendary Seed of Mornings to Calitoth | |
|---|---|
| Experience: | 46,709,251 (??% up to level ??) |
| Luminance: | 1,000 |
Images
Click image for full size version.

Adrenkus
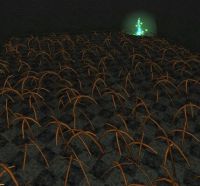
Non-targetable damage dealing Bloodroot Vines on bottom of jump rooms (also found in corridors and rooms)

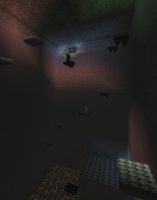
Jump Room 1

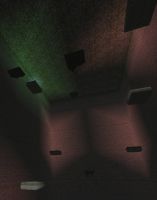
Jump Room 2, View from platform towards the goal
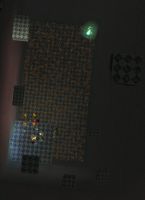
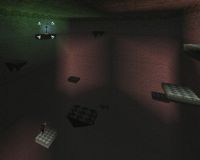
Birdeye view on room
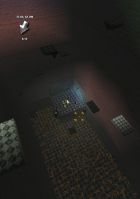
View from starting point facing N
View towards the starting platform
Jump Room 2, View from NW
Enchanted Seedling location in Jump Room 2 (View from exit, upper SE corner)


Dialog
- Opening Dialog
- Adrenkus tells you, "Greetings!"
- Adrenkus tells you, "Welcome to my little subterranean paradise!"
- Adrenkus tells you, "Well, we were originally set up on the surface, but the local fauna kept trying to eat the miners, so we relocated here."
- Adrenkus tells you, "So far, we've been able to hide this location from Hoshino Kei's forces, but I'm not sure how long that'll last."
- Adrenkus tells you, "This should be the location of the spirit of the Lady of Harvest and Justice. According to the Lady of Mysteries, as well as recorded legends that have been recovered, her spirit should rest in some sort of bulb or plant."
- Adrenkus tells you, "We need to recover her essence as quickly as possible, preferably before the spectral skeletons figure out where this site is."
- Adrenkus tells you, "If you'd be willing to brave the temple, you'll find the Guardian deeper in these tunnels. Just watch out for the local fauna."
- Rewards Dialog
- You allow Adrenkus to examine your Seed of Essence.
- Adrenkus tells you, "Utterly fascinating..."
- You hand over 1 of your Seed of Essences.
- Adrenkus tells you, "The magics of the Deru and the Light Falatacot never cease to amaze me."
- Adrenkus tells you, "Now, to see if the essence is intact..."
- Adrenkus chants over the seed, and a small wisp of light pours out of the seed and into his hand.
- Adrenkus tells you, "Beautiful, what is contained here is both intact and free of corruption. Well done, well done indeed."
- Adrenkus tells you, "It's only a small fragment of her essence, but it's progress all the same. As for this seed, I think you may find it useful."
- You've earned 198,157,237 experience.
- You've earned 20,000 Luminance.
- Adrenkus gives you Seed of Harvests.
- Adrenkus tells you, "If you're interested, I'll likely need your assistance again in a couple weeks. The bulb should be ready to produce another seed by then."
- Adrenkus tells you, "Also, my friend Norus has a dig site near the Inner Sea Gearknight area, but none of us have heard from him recently. If you could go see if he needs any help, it'd be greatly appreciated."
- You give Calitoth Legendary Seed of Harvests.
- Calitoth tells you, "Thank you. I'll send this along to my mistress. Please, accept this gift in return."
- You've earned 49,511,803 experience.
- You've earned 1,000 Luminance.
- Other Interactions
- You allow Bulb of Harvests to examine your Bloodroot Vine.
- You offer up the freshly picked Bloodroot Vines to the large plant. The vines themselves pulse with energy and begin to reach out toward the bulb, and then are absorbed in the plant.
- A moment later, the plant releases a small glowing seed.
- You hand over all of your Bloodroot Vines.
Update History
|