Empyrean Rescue Quest
Jump to navigation
Jump to search
| Verified This page has been verified to match the content available on Levistras. |
| Walkthrough & Notes Dungeons & Maps Rewards Images Dialog Update History |
| Empyrean Rescue Quest | |
|---|---|
| Required Level: | 180 |
| Type: | Fellowship |
| Starts With: | Emissary of Asheron |
| Starts At: | Cragstone at 24.4N, 48.3E |
| Repeat: | 20 Hours |
| Contracts: | Contract for Empyrean Rescue |
Overview
Come to Asheron's aid in rescuing a pocket of trapped Empyreans.
- Prerequisites
- You must be a Knight in a society faction in order to have access to Freebooter Isle where they are being held. This quest requires making two trips to Freebooter, so it is best if everyone is a Master and can use the statue in the society stronghold.
- There are several spots where it is easy to die and very difficult to recover a corpse, so beware of bringing items you might lose if you die.
- Bringing a royal runed bow or xbow for use on destroyable doors can be helpful.
Walkthrough & Notes
Part 1: Glowing Apostate Shard
- After speaking with the Emmisary of Asheron, travel to Freebooter Isle and run north to 54.0S, 97.6E where you will find an open magma tube style entrance (just north of a similar entrance used for Defeating Bandit Mana Hunter Boss).
- Stay left and you will find a portal not too far inside the cave.
- Inside the first dungeon, continue staying left for a long time and you will eventually find an Apostate Nexus Master. Kill him and everyone loot a Dark Apostate Shard (drops 9).
- Return the shard to the Emissary in Cragstone who will give you a Glowing Apostate Shard with a 60 minute timer.
Part 2: Sparkling Portal
- Return to the same dungeon on Freebooter and look for a blotchy/hazy looking portal. These are closed portals that spawn in fixed locations in a couple of places in the dungeon (sticking left you will pass two or three).
- Note: The closed portals won't show up on radar, you have to look for them visually (See notes below).
- Find an open Sparkling Portal as you move through through the dungeon and take it to enter the second dungeon.
- The second dungeon has several maze sections of interconnected rooms that you will have to navigate. It is possible to run through the dungeon without fighting, but it is easy to get stuck at certain spots due to the narrow hallways and the size of the Gear Knight enemies. At the end of the dungeon, you'll find an Apostate Nexus Guardian in a room with two surface portals (don't take either). Kill the guardian in the main room to avoid portal spawning issues. When the guardian dies, a white Gateway portal will open to the third dungeon. Take the portal.
- The mini map plugin helps to make navigating the maze sections easier.
Part 3: Pyramid Traps and Boss
- In the third and final dungeon, you will quickly come to a killable door. Take it out and proceed forward.
- Go slowly as you'll soon come to a hallway with pyramid traps similar to The Jester and Hoshino Must Die. The pyramids are typically instant death if you get hit by one. Using a pierce protection rare will negate all damage. There are five sets of alcoves on the sides of the hallway and you'll need to run from side to side (no more than one intersection at a time) until you make it past the pyramids. It is safest to wait until there are two pyramids close together that go past, then run to the next alcove. Then wait and repeat. The timing is fairly lenient so as long as you don't fumble your turns or the start of your running you should make it through ok.
- At this point the dungeon changes textures and the mobs start to get very dangerous. The undead and skeletons hit extremely hard and the hallways are so narrow that it is easy to become stuck if running. Remember that the dungeon is loggable though, it can help if you get really stuck.
- Continue until you get to a room with Wailing Statues and a door blocking the exit. Have ranged characters destroy the door, or if there aren't any, there is a safe spot just in front of it where the statues don't hit you.
- Continue down passing three cooled lava doors that are destroyable. After this is the jump down to the boss room. Be sure to re-buff before jumping down as the boss room is a hot landing.
- The boss room has a mostly invisible floor which is suspended over the lava. Several Undead Commanders are in the boss room by default. The first portion of the fight can be very dangerous, as the Undead Commanders hit very hard.
- Warning: Sparkling Portals may appear in the lava room—be careful not to enter one.
- After all the Undead Commanders and other spawns have been killed two named Undead (Filinuvekta Exarch and Filinuvekta Hieromancer) will spawn. They each drop the robe they are wearing when they die (decorative purposes only).
- Once those 2 are killed an Engorged Bloodstone will spawn (some have reported that using the glowing shard causes it to spawn). The bloodstone will not attack unless it is attacked first. This is a good time for anyone who died to get back to the boss room if possible. Note that some of the minor spawns in the boss room will respawn after a few minutes.
- Once everyone is ready, destroy the bloodstone. Everyone should then loot an Engorged Bloodstone Shard. It drops more than 9 (amount?) per kill. The entire boss fight sequence has to be repeated to get more shards if necessary.
- Once everyone has looted, move to the far side of the room where you'll find the wall has opened. Do a medium tap jump over the gap to the legendary rewards room.
- Loot a 3 use Legendary Key from the ground in the middle and use it on the chests.
- Return the shard to the Emissary of Asheron in Cragstone for your robe, xp, and luminance rewards. An animation of the Empyreans who were rescued is displayed after each person turns in their shard.
Notes
- The dynamic for the portals is that they activate every 12–15 minutes and turn red for 60 seconds and are named Sparkling Portal. During this phase you can enter the portal if you have the glowing shard in your inventory (you do not need to use the shard). While red, the portal also shows up on radar. So if you happen to get lucky and get there while it is red, just go right in. After the minute is up the portal will "disintegrate" and appear purple and hazy again. Some players have had the portal disappear entirely, if this happens continue on until you find another. The portals are a somewhat random spawn. If no portals are found, kill creatures within the dungeon and a portal will have a chance to spawn. After repeated testing it appears that despite the shard's description, using it has no effect on portals. It's just a matter of waiting for the portal to open on its own.
Dungeons & Maps
| Dungeon | Coordinates | Wiki Map | ACmaps |
|---|---|---|---|
| Empyrean Rescue Dungeon | 54.0S, 97.6E | -- |
Rewards
| Experience: | 430,962,225 (30% up to level 220) |
| Luminance: | 35,000 |
| Items: | |
Images
Click image for full size version.

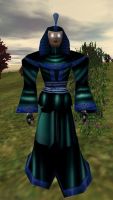
Emissary of Asheron
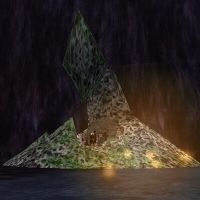
Entrance to the Empyrean Rescue Dungeon
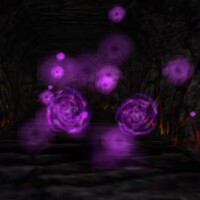
Disintegrated Portal
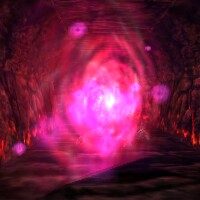
Sparkling Portal
One of the returning weakened Empyreans
_Live.jpg)

_Live.jpg)


Dialog
Opening Dialog
- Emissary of Asheron tells you, "Greetings!"
- Emissary of Asheron tells you, "I have been sent here to ask adventurers, such as yourself, to aid in a rather delicate situation my Lord Asheron has found himself in."
- Emissary of Asheron tells you, "We have found another pocket of temporal and portalspace disturbances similar to the ones located in the Iron Blade foothold in the Direlands."
- Emissary of Asheron tells you, "This newer disturbance is located along a mana flow underneath the volcano on the north end of the place locally referred to as 'Freebooter Isle'."
- Emissary of Asheron tells you, "Be warned, however, that this disturbance seems more powerful than the ones in the Direlands, and as it sits on a known Ley Line, the potential threat is far greater."
- Emissary of Asheron tells you, "Gather strong friends, bring them all to me, so I may offer them what protections I can, and then begin your hunt."
- Emissary of Asheron tells you, "Now, as to those mentioned protections..."
- The Emissary of Asheron utters a single, harsh sounding word, and a tingle washes over you.
- Emissary of Asheron tells you, "Find the force or entity responsible, end it. Return to me with proof, or better; a way to save my lord's people, and I'll reward you for it."
- Emissary of Asheron tells you, "Any questions?"
- Emissary of Asheron tells you, "Hello again! Have you located the source of the disturbance that is blocking my Lord Asheron's ritual from rescuing the pocket of Empyreans he has located?"
- Emissary of Asheron tells you, "The main source of the disruption seems to be coming from an area under the Freebooter Isle Volcano, likely inside one of the steam vents that riddle the area."
- Emissary of Asheron tells you, "Be warned, though, the portalspace disruptions in the area are massive, and my lord Asheron also believes there is a large scale temporal disturbance being shielded by the portalspace disruptions."
- Emissary of Asheron tells you, "Take friends, be careful."
Giving Dark Apostate Shard to Emissary of Asheron
- You allow Emissary of Asheron to examine your Dark Apostate Shard.
- Emissary of Asheron tells you, "Interesting. This is similar to the Apostate Shards being found in the area of the Iron Blade Gear Knights, but there seems to be some sort of supression effect or ward upon it."
- Emissary of Asheron tells you, "Let me see what I can do about that."
- You hand over 1 of your Dark Apostate Shards.
- The Emissary of Asheron chants softly in an odd singsong language. After a moment, there's a faint 'pop' sound, and the shard begins to glow.
- Emissary of Asheron tells you, "Ah, there we go. This should now allow you to slip through a portalspace fluxuation in the area near where you found it, and bypass the Apostate's defenses to the area it is attuned to."
- Emissary of Asheron tells you, "Here you go. Don't waste time, however, as it seems somewhat unstable. Head back to the steam vents near the Freebooter Isle Volcano, find an anomoly that looks similar to the destroyed portals, and use it next to the fluxuations you see."
- Emissary of Asheron gives you Glowing Apostate Shard.
Rewards Dialog
- You allow Emissary of Asheron to examine your Engorged Bloodstone Shard.
- Emissary of Asheron tells you, "What's this?!"
- You hand over 1 of your Engorged Bloodstone Shards.
- Emissary of Asheron tells you, "Well, when I sent you to investigate the Apostate Activity on Freebooter Isle, I did not expect you to come back with a shard like this."
- Emissary of Asheron tells you, "This is a shard off of an animate Blood Stone. Dark things, those, and this one has been used in some sort of draining ritual, and a powerful one at that."
- Emissary of Asheron tells you, "Come, tell me, how did you come about this?"
- You explain to the Emissary about the Undead you found allied with the Apostates, and the information you gained in defeating them.
- Emissary of Asheron tells you, "Hmmm... This explains much, and is very troubling. If the old Emperor of the Dericost is involved in this, there is no telling how deeply these troubles will run."
- You've earned 430,962,225 experience.
- Emissary of Asheron tells you, "But, for now, let me reward you for your assistance, and then we'll see if I can use the signatures on this to rescue some of the Empyreans this Bloodstone was affecting."
- Emissary of Asheron gives you Empyrean Over-robe.
- Emissary of Asheron gives you Strengthened Mana Forge Key.
- You've earned 35,000 Luminance.
- Emissary of Asheron tells you, "Now, let's see if we can put this shard to good use."
- Emissary of Asheron says, "Shirov Tangoli Sith"
- The Emissary of Asheron ponders the weakened Empyreans for a moment.
Other Interactions
- The crystal glows brightly for a moment when you activate it, and a Portal appears!
Update History
|