Assassin's Roost Quest
| Verified This page has been verified to match the content available on Levistras. |
| Walkthrough & Notes Dungeons & Maps Rewards Images Dialog Update History |
| Assassin's Roost Quest | |
|---|---|
| Required Level: | ?? |
| Recommended Level: | 80 |
| Type: | Solo |
| Starts With: | Contact Instructions |
| Starts At: | |
| Repeat: | 20 Hours |
Overview
- Custom: The experience rewards for this quest have been adjusted. See rewards section for details.
Selaina was a master assassin on Ispar and now she has come to Dereth and is creating a new order of assassins here. During this quest you will track down Selaina to her headquarters called the Assassin's Roost, a tower in the South Direlands. Getting to the top of the tower requires you to follow a series of clues found all over Dereth then traveling though a dungeon set with several puzzles to complete.
- This quest has many different divergence points and gives you choices about how you want to complete it.
- Warning: You must bring MMDs with you if you want to buy any of the item rewards. Be sure to bring enough MMDs to buy everything you want to buy. See prices for different items here.
Walkthrough & Notes
Contact Instructions
- Kill Human Bandits and Viamontians until one of them drops Contact Instructions (Bottle Clue), Contact Instructions (Knowledge Clue), or Contact Instructions (Sign Clue).
- * Read the text of the instructions right away because it will "self destruct" in 8 minutes after you've looted it.
- * The text will point you towards the first clue you must find. You must find the first clue referenced in the instructions within one week of looting it or else you'll need to find another text.
- * Places to hunt:
- ** Hunter's Leap dungeon.
- ** All around Marae Lassel for Mercenaries, Poachers, Assassins and others.
- ** Viamontians in the Augmentation dungeon.
- ** Viamontians at the Staging Areas around Glendon Wood.
- ** Viamontians on the Isle of Ruin (near Eastwatch).
Following the Clues
- Read the Contact Instructions.
- There are 3 separate ways the quest diverges at this point. Read your Instructions to see which of the three clue trails you must follow.
Contact Instructions 1
- "A wish to find the one for which you seek starts with knowledge.
- Knowledge is power, even if it is not power you seek.
- Discipline over ones temptations is needed to control power."
- Go to the Hebian Library (39.2S, 81.6E) and use the Open Book on the top floor.
- Now go to Bandit Castle and use the Tree at 65.8N 49.6E.
- Find a Mud Golem Heart and give it to the Stone Collector in Zaikhal to receive a Mysterious Untranslated Scroll.
- Take the scroll to Kuyiza bint Zayi in the Zaikhal Library at 14.0N, 0.1E.
- Buy Danby's Ale at Danby's Outpost from Barkeep Aliece Landlig.
- Hand Ulgrim the Ale and he will give you a Skipping Stone.
- Give the Skipping Stone to any Fishing Hole to be portaled to the dungeon.
Contact Instructions 2
- "It is ours to search for signs in life.
- Be it around town.
- No matter how swamped you may be."
- Go to the Sawato and use the Sign at 28.4S 59.7E.
- Then go to Sanamar and use the Skeleton on the 2nd floor of the Viamontian Great Hall at 69.8N, 62.3W.
- Find a Green Phyntos Wasp Wing and give it to a Sho Wing Collector (There is one in Mayoi) to receive a Mysterious Untranslated Scroll.
- Take the Mysterious Untranslated Scroll to Fanzen San the Translator in the Hebian-To Library at 39.2S 81.6E.
- Buy Danby's Ale at Danby's Outpost from Barkeep Aliece Landlig.
- Hand Ulgrim the Ale and he will give you a .
- Give the Skipping Stone to any Fishing Hole to be portaled to the dungeon.
Contact Instructions 3 (Bottle)
- "We often search for answers at the bottom of a bottle.
- This time, you may find the answer is right."
- Go to the Holtburg tavern and use the Bottle.
- Now go to Wai Jhou and use the Encrusted Scroll Case. It is in the top floor of the tower in front of the Joji Shrine.
- Then give a Drudge Charm to an Aluvian Collector (one in Holtburg) to receive a Aged Mysterious Untranslated Scroll.
- Take the Aged Mysterious Untranslated Scroll to Bretself the Translator at the Cragstone Library at 26.0N 47.0E.
- Buy Danby's Ale at Danby's Outpost from Barkeep Aliece Landlig.
- Hand Ulgrim the Ale and he will give you a Skipping Stone.
- Give the Skipping Stone to any Fishing Hole to be portaled to the dungeon.
The Roost Dungeon
Note: Once you are in the dungeon, if you leave or die you will have to go through the entire series of clues again to obtain another Skipping Stone to return. You do not need another Contact Instructions but you do need to redo the clues starting at the bottle, sign, or book.
You can also use the above to your advantage. Since each item turn-in (Drudge Charm, Green Phyntos Wasp Wing or Mud Golem Heart) nets you 1 million experience points, you can redo the clues repeatedly for numerous Skipping Stones and experience rewards (unknown expiration timer).
Door Key
- From the drop you will find a room full of Bottles, Barrels, and Kegs that can be killed like creatures, but you must manually select them. Destroy them until one drops a 3-use Door Key. (Barrels appear to have the best drop rate)
- Warning: Mages may have difficulty destroying the items to find a key - they are highly magic resistant.
- Use the key on the locked door.
- From this point there are two trials to complete, with an optional kill task that can be used to bypass each trial.
- Warning: By opting out of a trial, you will receive no xp or title.
Trial 1: Floor Puzzle
- If you step on an incorrect tile, it will portal you back to the start (similar to the puzzle on the Gaerlan's Citadel quest).
- Navigate a floor of tiles based on the pattern provided below.
- Talk to Lander, the NPC at the end, to receive 10 million experience and the title Sure Step.
- In order to bypass the trial:
- You will find a hallway that will branch off from the hallway leading to the the trial.
- Go down until you find Ardenson, an NPC that gives a kill task for 50 Black Rats which are found around him.
- Kill 50 Rats and return to the NPC and he will teleport you past the trial.
Step by step directions for the Floor Puzzle:
- First will be the direction then the color of the tile you should be on having moved that direction. You will leave the board 4 times. 3 During the crossing and the 4th at the end.
- Start on the north path. W, Green, W, Blue, W, Orange, W, Purple, W, Purple, W, Orange, S, Blue, W, Green, S, Blue, S, Orange, E, Orange, E, Green, S, Purple, S, Green, S, Purple, S, Orange, W, Orange, W, Purple, W, Purple, S, Green, W, Orange, W, Blue, N, Blue, W, Orange, W, Green, N, Green, W, Green, N, Orange, N, Purple, N, Green, N, Purple, E, Purple, E, Blue, E, Blue, N, Green, N, Orange, N at which point you are off the board.
- You get back on at a green space it is 2 spaces west. Then W, Blue, W, Purple, W, Green, W, Blue, W, Orange, W, Orange, S, Purple, S, Green, W, Purple, W, Green, N, Green, W, Orange, N, Orange, N, at which point you are off the board for the second time.
- You get back on at the Purple space it is 4 spaces west. Then S, Orange, E, Purple, S, Orange, E, Purple, E, Green, S, Green, S, Blue, S, Orange, S, Purple, S, Green, E, Purple, E, Orange, S, Blue, S, Orange, S at which point you are off the board for the third time.
- You get back on at the Purple space it is 4 spaces west. Then N, Green, W, Orange, N, Purple, N, Purple, W, Blue, N, Orange, N, Orange, N, Purple, W, Green at which point you are finished.
Abridged by direction:
- Compass direction and number of tiles
- N path, W6, S1, W1, S2, E2, S4, W3, S1, W2, N1, W2, N1, W1, N4, E3, N3 (off).
- W2 to Green space (on), W6, S2, W2, N1, W1, N3 (off).
- W4 to Purple space (on), S1, E1, S1, E2, S5, E2, S3 (off).
- W4 to Purple space (on), N1, W1, N2, W1, N3, W2 (done).
Abridged by color:
- G = Green/Acid, B= Blue/Water, O = Orange/Fire, P = Purple/Lightning
- G B O P P O B G B O O G P G P O
- O P P G O B B O G G G O P G P
- P B B G O G B P G B O O P G P G G O O
- P O P O P G G B O P G P O B O
- P G O P P B O O P G
Trial 2: Bridge Jumping
- Warning: If you fall during this trial there are many Wailing Statues below which continually cast Sacrificial Edges (flying knives). Movement when getting hit by knives is reduced significantly. Lower level characters could easily die so you may want to have an Aphus Lassel Portal Gem handy. If you survive a fall there is a door which allows access back to the jump quest start point, but it is a very difficult task.
- Jump across several bridges and platforms, using the levers in each room to open doors as needed.
- Talk to Maniel at the end to receive 10 million experience and the title Bridge Jumper.
- To proceed to the portal, you must shift+jump down to a platform which is below the space between the last bridge and the landing where the NPC stands.
- In order to bypass the trial:
- You will find a hallway that will branch off from the hallway leading to the trial.
- Go down until you find Maximas who gives a kill task for 50 Weak Mangy Carenzis which are found around him.
- Kill 50 Carenzis and return to the NPC and he will teleport you past the trial.
- :Maximas teleports you with Jump Puzzle Bypass.
Suggested Jump Strategy
- Doors stay open for about 5 minutes. If you have any doubts after a retry that they will stay open long enough, close and reopen them.
- From the door, move toward the bridge ahead. Stand near the edge on the right side, turn left and aim at the opening on the left end of the bridge. Long jump.
- Enter the room on the left and use the lever to open the gate on the other side of the bridge.
- Go across to the room on the other side and use the lever. Turn left and walk to the edge of the doorway opening in the wall.
- If you look down, left and across the bridge below you should see the far gate open. If it's not open, pull the lever behind you again.
- Aim straight at the open gate below and do a full-power long jump.
- Pull the lever in this room, and then run across the bridge and pull the next lever.
- Go back onto the bridge and shift-jump onto the railing. The center is good for this - jump at a slight angle. Walk on the railing to the left until you are nearly to the corner of the left room.
- Shift-jump to the first fading platform and turn left.
- Check your jump height by jumping straight up and make sure you can jump high enough for the next fading platform - you may need to raise your jump skill.
- Full power shift-jump up to the next fading platform, it is two-spaces wide.
- Turn right and line-up with the opening in the wall across from you and slightly above. Take a quick look down and note the floor below...
- This jump is the hardest jump. It is not a tap jump, nor a full power jump, but somewhere in between (depending on your jump skill). I always use an Aphus Lassel Portal Gem if I miss this jump, but use your best judgement.
- After you make the jump, use the lever in the room to open the gate on the right.
- Go across the bridge and use the next lever to open the door on the balcony below (provides access to the shopkeeper NPCs, not needed to complete the jump puzzle).
- Turn left and walk to the edge of the doorway opening in the wall. Long jump out of the doorway to Maniel on the far platform.
- Talk to Maniel for your reward. If you do not wish to access the tower NPCs then you are done.
- To access the tower NPCs, go to the edge and note the balcony and door below.
- Turn around, (optionally take one walking step forward) and do a tiny backward shift-jump to the balcony below.
Exit to the Tower
- Once you are past the trials you must run up many flights of spiral stairs until you reach a yellow portal.
- The portal deposits you at the bottom of the Tower in the South Direlands where Selaina the Subtle and Creed reside.
- Once done it is possible to jump down and run to the Wai Jhou lifestone.
The Tower
- If you attempted to kill Selaina in the past and have died or killed her and try to give her any of the writs before giving her a writ of forgiveness she will eat them up and give you nothing.
- At the top of the tower is Creed and Selaina the Subtle. Creed is a vendor that sells several different items in exchange for MMDs. Selaina looks like an NPC but can be attacked like a regular creature although she only attacks players once provoked.
- Creed sells several writs that can be given to Selaina in exchange for an Society Armor Writ, a Mana Forge Key, or a couple special titles (Assassin and Death Dealer). Also he has a portal gem that goes straight to the tower.
- Creed sells a Cowl and a Dagger that can also be obtained by killing Selaina. The Cowl always drops while the Dagger may not. The stats of the cowl and dagger sold by Creed and looted from Selaina have identical stats but slightly different descriptions.
- If you kill Selaina you must purchase a Writ of Forgiveness from Creed and hand it to Seliana if you ever want to get anything from her in the future. According to her the more you kill her the more expensive it becomes to obtain forgiveness.
Fighting Selaina
- Debuff Selaina's Dagger before starting the fight. The debuffs on her dagger will not cause her to attack you yet.
- * When your first blow lands she will teleport you to the top of the tower so there is no point to trying to hide on the lower levels.
- Selaina uses a multi-strike dagger and can hit for a lot of damage if your melee defense is not very high. However, for characters over level 180 it is unlikely she poses a significant threat. If you are with more than one person, consider having a healer on standby.
- When she dies she drops the Assassin's Cowl (100% of the time) and can drop the Assassin's Edge (not 100% drop rate) as well as some generic armor.
- * Note: The value of items dropped would be 520 MMDs if you were going to buy them from Creed. So if you want the Cowl and Dagger then killing Selaina may be the best option economically speaking presuming she drops the Dagger for you. 520 MMDs > 50 MMDs for the Writ of Forgiveness.
Alternatively, a Duelist's Jewel, the slashing protection rare, will reduce all slashing melee damage significantly. When used in combination with a shield with 1000 buffed protection from slashing, all of Selaina's slashing hits were reduced to 0 damage, even with imperil 7. Piercing hits were rare and very weak, hitting for around 25 damage.
Update: As of 2013, due to the introduction of higher level loot (tiers 7 and 8), a higher level character (level 250+) that is reasonably well equipped has little to fear from Selaina. Having melee defense of 500 or higher will result in virtually no attacks hitting you. Needing a slashing rare or healer is probably only necessary for lower level characters.
Notes
- The quest is not split up by race. As long as you find each respective letter, you can get the clues that correspond.
Dungeons & Maps
| Dungeon | Coordinates | Wiki Map | ACmaps |
|---|---|---|---|
| Roost Dungeon | N/A | -- | -- |
| Trial 1: Floor Puzzle | N/A | -- |
Rewards
| Turning in Creature Trophy | |
|---|---|
| Experience: | Custom: 1,000,000 (10% up to level 60) |
| Sure Step Trial | |
|---|---|
| Experience: | Custom: 10,000,000 (100% up to level 60) |
| Titles: | Sure Step |
| Bridge Jumper Trial | |
|---|---|
| Experience: | Custom: 10,000,000 (100% up to level 60) |
| Titles: | Bridge Jumper |
Creed the Vendor
| Vendor rewards | |
|---|---|
| Item | Price (MMDs) |
| 20 | |
| 50 | |
| 50 | |
| 50 | |
| 100 | |
| 50 | |
| 100 | |
| 500 | |
Images

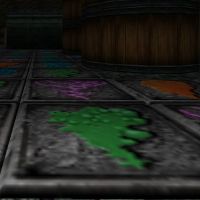
The Bottles and Kegs you kill for the Key
The Tiles of the Floor Puzzle
One of the Levers in the Jumping Puzzle

Don't Fall...
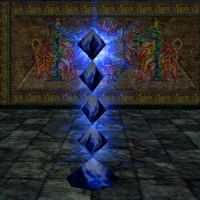
Interesting Sculpture


Dialog
- Sign Clues
- You remember that note you found said something about signs, towns and swamps.
- You lean a bit to one side as you read the sign before you.
- It reads, "Torture, the dead, Viamont."
- Using Skeleton
- You kneel next to the piles of bones. As you do you hear a voice.
- Lieutenant Dialossa tells you, "Deliver a green wing to a Sho who specializes in collecting such."
- As you look up at Lieutenant Dialossa he pays you no heed.
- You think you've learned all you can here.
- Giving Green Phyntos Wasp Wing to Sho Wing Collector
- You give Wing Collector Green Phyntos Wasp Wing.
- Wing Collector tells you, "Take this note to Fanzen San the Translator. He'll tell you what to do with it."
- Wing Collector gives you Mysterious Untranslated Scroll.
- Wing Collector tells you, "I'll keep the bounty I usually pay for these."
- You've earned 1,000,000 experience.
- Giving Mysterious Untranslated Scroll to Fanzen San the Translator
- You give Fanzen San the Translator Mysterious Untranslated Scroll.
- Fanzen San the Translator tells you, "I'll keep this simple. Visit Danby's outpost and buy one of their special ales for Ulgrim."
- Knowledge Clues
- You remember that note you found said something about power discipline and temptation much like the story of Koji you can find in this very building.
- You pick up the book and begin to read. As you flip through the pages a note falls out.
- It reads, "The forest, near castle, carved in wood."
- Using the Tree outside Bandit Castle
- You lean trying to disern the purpose of the carving on this tree.
- Just as confusion as to the purpose of this mark sets over you a voice on the wind reaches its way to your ear.
- It says "Bring a heart of mud to a Gharu'ndim collector of such."
- You think that this is what you were meant to learn here and you should now be on your way.
- Giving Mud Golem Heart to Stone Collector
- You give Stone Collector Mud Golem Heart.
- Stone Collector tells you, "Take this note to Kuyiza bint Zayi the Translator. She'll tell you what to do with it."
- Stone Collector gives you Mysterious Untranslated Scroll.
- Stone Collector tells you, "I'll keep the bounty I usually pay for these."
- You've earned 1,000,000 experience.
- Stone Collector tells you, "Yes, very good."
- Giving Mysterious Untranslated Scroll to Kuyiza bint Zayi
- You give Kuyiza bint Zayi the Translator Mysterious Untranslated Scroll.
- Kuyiza bint Zayi the Translator tells you, "It's not that I am unable to translate this note but rather that its text actually is not actually text at all."
- Kuyiza bint Zayi the Translator tells you, "These notes are spread by the followers of a person of great power and skill."
- Kuyiza bint Zayi the Translator tells you, "If you'd like to contact this person I'd suggest visting Danby's Outpost and getting
- Ulgrim some of the special ale they're selling there."
- Giving Danby's Ale to Ulgrim the Unpleasant
- You give Ulgrim the Unpleasant Danby's Ale.
- Ulgrim the Unpleasant tells you, "Oh, you purchased me another ale."
- Ulgrim the Unpleasant tells you, "How kind."
- Ulgrim the Unpleasant tells you, "Kid, I don't know if you're trying to poison me or what but that's swill!"
- Ulgrim the Unpleasant tells you, "Tell ya what, why don't you go skip a rock."
- Ulgrim the Unpleasant gives you Skipping Stone.
- Ulgrim the Unpleasant tells you, "And take your dirty skunk ale with you!"
- Giving Skipping Stone to Fishing Hole
- You give Fishing Hole Skipping Stone.
- You reach out your hand and drop in the rock that Ulgrim gave you.
- As the rock hits the water it begins to swirl oddly.
- Fishing Hole teleports you with Mysterious Portal.
- Bottle Clues
- You remember that note you found said something about the bottom of the bottle... could it be?
- You kneel down and examine the bottom of the bottle to discover another note.
- It reads, "Wai Jhou, the shrine, read scroll."
- Using Scroll Case
- You kneel down before the shrine and start to examine the scroll case when you hear a voice.
- Riordin Nightbane tells you, "Let an Aluvian collector see the charm of a drudge."
- As you look up at Riordin Nightbane he pays you no heed.
- Giving Drudge Charm to Holtburg Collector
- You give Collector Drudge Charm.
- Collector tells you, "Take this note to Bretself the Translator. He'll tell you what to do with it."
- Collector gives you Aged Mysterious Untranslated Scroll.
- Collector tells you, "I'll keep the bounty I usually pay for these."
- You've earned 1,000,000 experience.
- Collector tells you, "Good luck in your travels."
- Giving Aged Mysterious Untranslated Scroll to Bretself the Translator
- You give Bretself the Translator Aged Mysterious Untranslated Scroll.
- Bretself the Translator tells you, "There is no translation for this but I know what the intent is none the less."
- Bretself the Translator tells you, "If you are sure this is the type of person you'd like to get involved with then I have a message for you to listen to."
- Bretself the Translator tells you, "In Danby's Outpost you'll find a new bartender. He's got a special Ale. I think Ulgrim might be interested in having a taste."
- Giving Danby's Ale to Ulgrim the Unpleasant
- You give Ulgrim the Unpleasant Danby's Ale.
- Ulgrim the Unpleasant tells you, "Oh, you purchased me another ale."
- Ulgrim the Unpleasant tells you, "How kind."
- Ulgrim the Unpleasant tells you, "Kid, I don't know if you're trying to poison me or what but that's swill!"
- Ulgrim the Unpleasant tells you, "Tell ya what, why don't you go skip a rock."
- Ulgrim the Unpleasant gives you Skipping Stone.
- Ulgrim the Unpleasant tells you, "And take your dirty skunk ale with you!"
- Giving Skipping Stone to Fishing Hole
- You give Fishing Hole Skipping Stone.
- You reach out your hand and drop in the rock that Ulgrim gave you.
- As the rock hits the water it begins to swirl oddly.
- Fishing Hole teleports you with Mysterious Portal.
Dungeon NPC's
- Speaking with Lander
- Lander tells you, "I see that you've made it past the floor puzzle."
- Lander tells you, "You have to be sure of each step you take or else everything you worked for could be undone."
- Lander tells you, "Not sure why I'm telling you this, you are here."
- You have been granted the title of Sure Step
- You've earned 10,000,000 experience.
- Speaking with Maniel
- Maniel tells you, "I've watched many people fall durring my time here."
- Maniel tells you, "How could I not love my job! It's a laugh a minute."
- Maniel tells you, "I have to congratulate you on making it this far, that was some quality bridge jumping."
- You have been granted the title of Bridge Jumper
- You've earned 10,000,000 experience.
Assassin's Roost
- Selaina the Subtle
- Selaina the Subtle tells you, "You've come a long way to find me."
- Selaina the Subtle tells you, "Be it through intelligence will or brute force, it matters not."
- Selaina the Subtle tells you, "What does matter is the business that we deal in, the business of death."
- Selaina the Subtle tells you, "Creed will supply you with the things you need to hold a position in our ranks."
- Selaina the Subtle tells you, "Do you have what it takes to stand amongst the members of this elite fraternity of killers?"
- Attacking Selaina
- Selaina the Subtle tells you, "Get over here!"
- Trying to give Selaina a Writ after killing her
- You give Selaina the Subtle Assassin Title Writ.
- Selaina the Subtle tells you, "I'll have nothing to do with you."
- Selaina the Subtle tells you, "I have been offended by your actions."
- Selaina the Subtle tells you, "Creed may have something that will get you back in my good graces... but it'll cost you."
- Giving Selaina a Writ of Foregiveness after killing her
- You give Selaina the Subtle Writ of Forgiveness.
- Selaina the Subtle tells you, "Death's a business. This is something I definitely understand. I'll forgive you of your transgressions against me for now but if you do it again it'll cost you more coin and I'm only willing to let you redeem yourself once a week."
- Giving Mana Forge Key Writ to Selaina
- You give Selaina the Subtle Mana Forge Key Writ.
- Selaina the Subtle tells you, "In the grasp of the wicked you can often find useful things. I took this key from one who stood against our point of view after I slew him in single combat."
- Selaina the Subtle gives you Mana Forge Key.
- Selaina the Subtle tells you, "As a precaution I can only give you one of these every week."
- Giving Death Dealer Title Writ to Selaina
- You give Selaina the Subtle Death Dealer Title Writ.
- Selaina the Subtle tells you, "Go forth and dispatch those who stand against your authority."
- Selaina the Subtle tells you, "This is your duty as a Death Dealer."
- Giving Assassin Title Writ to Selaina
- You give Selaina the Subtle Assassin Title Writ.
- Selaina the Subtle tells you, "You are now a member of an elite fraternity of assassins."
- Selaina the Subtle tells you, "As a member of this fraternity you may display the title of Assassin."
- Giving Society Armor Writ to Selaina
- You give Selaina the Subtle Society Armor Writ.Selaina the Subtle tells you, "I looted this off the corpse of a man I killed just outside the Black Market. I took it from his grasp as I watched the life drain out of his eyes when he was pulled back to his lifestone."
- Selaina the Subtle gives you Ornate Armor Writ.Selaina the Subtle tells you, "As a precaution I can only give you one of these every week."
- Speaking with Creed
- Creed tells you, "Greetings, I work for Selaina the Subtle. She runs a tight ship and a fine business. As we say, Death is a business."
- Creed tells you, "Nothing sounds quite like a stack of fresh MMD notes."
- Creed tells you, "May fate be kind to you."
Update History
|