Ries Woron's Story
(Redirected from Thugs Part IV)
Jump to navigation
Jump to search
| Warning: Unverified Content This page may not match in game information. Please correct any errors that exist and remove {{Needs Verification}} from the top of this page! For more information see Help:End of Retail Content. |
| Walkthrough & Notes Dungeons & Maps Rewards Images Dialog Update History |
| Ries Woron's Story | |
|---|---|
| Required Level: | ? |
| Recommended Level: | 125 |
| Type: | Fellowship |
| Starts With: | Ries Woron |
| Starts At: | Baishi at 49.5S, 62.7E |
| Route: | Town Network east |
| Repeat: | 20 Hours |
Overview
- This quest requires someone with Lockpick skill.
- You cannot log out in the Thug Hideout - you will appear back at the lifestone.
- If you intend to pick up the Pile of random parts as part of the Gear Knight Parts quest, make sure you have spoken to Nurino before starting this quest.
Walkthrough & Notes
Part 1: Beginning Ries Woron's Story
- When your group is assembled, speak to Ries Woron to get portaled to the Thug Hideout.
- Warning: This quest has a 90 minute timer. You must kill all the Thugs and complete the quest before the timer expires, otherwise the various checkpoints will shut, preventing you from completing the quest.
- The first person who talks to Ries Woron should receive the Story of Ries Woron book, which tells you the amount of time you have remaining to complete the quest. If this item is not received, someone has already started the quest and the timer is already running. The book timer counts down from 90 minutes.
- If another group has already started the quest, you will receive a message asking you if you want to enter anyway. This only appears after a few minutes, allowing for everyone in your group to get inside first.
- If you die or fall into a pit, portal recall and talk to Ries again for a ride back to the dungeon.
- The respawn in the dungeon is 60 minutes for Thugs. Any brown or white mice that spawn are on a regular respawn. This generally makes it safe to run back if you fall or die.
- When you first enter the dungeon, it will likely be empty except for possibly a mouse. The Thugs will soon spawn.
- The first section of the dungeon contains Thugs and Thug Bosses. Make sure you kill them all.
- Beyond the first room there is a lever on the wall which opens the next 2 doors. These doors can only be opened via the lever.
- In the next rooms, one of the Thug Bosses holds the First Gate Key. Use the key to open the first gate. Note that the gate is a normal door and will shut and lock again after a minute or so.
- The second section contains more Thugs. Eventually you will reach another gate with 2 side rooms full of locked chests (500 difficulty).
- The Second Gate Key is located in one of the locked chests. This key is 2 use and is used to open the next 2 gates.
- If you wait for it, the second key will respawn again in the chest. You can then loot additional keys for future runs if desired. The key is giveable.
- Past the second gates is a room with 2 bridges. The bridges are triggered by a floor plate at the front of the room. Do not jump while the bridge is going up or you may fall into the pit. The bridges are on a normal timer and will go back down after a minute or so.
- Keep heading north until you get to a long room with a throne. This is the first checkpoint. The wall behind the throne will only open if all the Thugs prior to this point have been killed.
- Note that the fireplace mantle is not the checkpoint. The checkpoint is the brick wall beyond and to the left.
- Beyond the throne room, there is a fork in the path. The right path leads back to the start of the dungeon and the backdoor (see below). Take the left path to continue northward.
- You will come to the first jump pit. Use a full power jump over the pit. If you fall, you must recall and talk to Ries again to re-enter the dungeon. You need a jump skill of approximately 200 to make the jump.
- You will come to a long room full of Thugs on three different levels. Do not enter this room from the bottom or you will be swarmed and die. Go up the left or right passages to the top level and start fighting from there. All of the Thugs respawn once, so be ready. This is where many people die or too much time is spent killing if you do not have a capable group.
- Optional: In this room you will see cages, some with a Trapped Townsperson. Kill all the Thugs and you can open a cage and free the Townsperson. Talk to her for the title "No Cage Can Hold Me" (this part can be buggy and may not work).
- Once all of the Thugs are dead, the doors to the north will open. This is the second checkpoint.
- Note: There are several sets of doors in this room on each level. All of them lead to a pit you must jump over and then to the same location. Most people use the doors on the bottom level.
- Next you will come to the second jump pit. Again use a full power jump to get across.
- Eventually you get to a room where Fiona is trapped in a cage. There are several Thugs to kill here.
Part 2: Rescuing Fiona Woron
- On the right side of the room there are some tables containing Mixing Bowls and 4 bottles labeled A through D. There is also a Cooking Vat beside a table. On the left side of the room you will see a Recipe. Ignore the recipe! It will just get you killed. There is only one correct potion that will cure Fiona. Other combinations of potions will have various effects including: nothing happening, killing you, casting Poison Health on you, summoning a portal to the top of Palace at Sanamar, killing Fiona, or turning Fiona into a Wight Blade Sorcerer. Only one person in your group needs to mix a potion:
- Pick up Bottle A, Bottle C, and Bottle D.
- Hand Bottle A to the Mixing Basin followed by Bottle C. This should get you a Green Potion.
- Hand Bottle C to the Mixing Basin followed by Bottle D. This should get you a Purple Potion.
- Hand both bottles to one of the Cooking Vats. This should get you a Black Potion.
- Unlock the cage that holds Fiona (350 Difficulty) to let her out. Then hand her the Black Potion (only Black!). You only need one person from the group to hand her a potion.
- Have everyone talk to Fiona for a Braced Mana Forge Key. Only talk to her once the potion has been handed in!
Part 3: The Unknown Warrior
- There are 2 brick walls that open within the room where Fiona is. Each is activated by a bookcase within the room.
- Optional: If you want to obtain a Gear Shield as part of the Gear Knight Parts quest (Level 130), then use the NW bookcase to open the south brick wall and pick up thePile of random parts from the altar. The parts weigh 1,000 burden so don't pick them up unless you want the shield.
- Use the SW bookcase to open the north brick wall. When you get to the doorway wait for the bridge then all cross the bridge to the center platform where The Unknown Warrior waits. Do not talk to The Unknown Warrior until you are ready to fight. His sword and shield can be debuffed before you start the fight. When he is about to die he portals out and several Thug Bosses will spawn. Kill them.
- Once the Thug Bosses are killed, there is a 5 minute delay before the bridge reappears and the far gate opens. Do not try to jump onto the bridge or you will have to recall and run back.
- Warning: The bridge only stays up for approximately 5 minutes. This means anyone who might be running back must get there before the 5 minutes is up. Once the bridge goes down, the quest is over, regardless of how much of the 90 minutes has passed.
- Across the bridge to the north is a room with the five pieces of the Armor of Darkness. Pick up the item of your choice. The pieces are givable.
- Notes
Back Door
- If someone dies or misses a jump, the back door can be used to rejoin the group after recalling and talking to Ries again. The switch for the back door is on the inside, so someone who didn't fall/die must run and open it ahead of time. It is a good idea to appoint someone to go and open the back door in case it is needed. You cannot run back the normal way due to the various gates which require keys.
- After the throne room, take the right path at the fork and run down the very long hallway.
- Pull the switch on the wall to open the back door. The door looks like a brick wall.
- Note that the back door is accessed by taking the southeast path in the first room of the dungeon (turn right from portal drop). A short jump is needed to hop over into the long passageway.
- The backdoor is on its own timer and stays open for a very long time (possibly an hour or more) It does not shut automatically when the quest timer expires.
Obtaining multiple pieces of armor
- Since the quest is not fellowship locked, it is possible to obtain multiple pieces of armor on a single account by having an alternate character enter the dungeon and run to the end. If you are planning on attempting this, it is a good idea to move your second character to Baishi ahead of time. There are several conditions that must be met for this to work.
- The back door must be opened.
- The character must have a jump of at least 200 to get over the 2 pits.
- The quest must be completed (Unknown Warrior killed) with a sufficient amount of time left that another character can run to the end. It takes approximately 5 minutes to run from the start of the dungeon to the armor room.
Timer expiration
- The exact mechanics of the quest timer expiring are not fully known. Below is a list of known/unknown things which occur when the timer is up.
- The first and second checkpoints close. (wall behind throne, all double doors in multi-level room)
- The bridge to the Unknown Warrior goes down (unconfirmed).
- Fiona respawns within her cage (unconfirmed).
- Any existing spawn within the dungeon (excluding mice) vanishes.
- Note that the final bridge is on a separate timer which starts when the Unknown Warrior vanishes (5 minutes until it raises, then 5 minutes until it lowers again).
Dungeons & Maps
| Dungeon | Coordinates | Wiki Map | ACmaps |
|---|---|---|---|
| Thug Hideout | 65.8S, 77.2E | -- | -- |
Rewards
| Rescue Fiona Woron (Level <125) | |
|---|---|
| Experience: | 83,144,206 (51.6% up to level 124) |
| Items: | |
| |
| Rescue Fiona Woron (Level 125+) | |
|---|---|
| Items: | |
| Free a Trapped Townsperson | |
|---|---|
| Titles: | No Cage Can Hold Me |
| Defeat The Unknown Warrior | |
|---|---|
| Items: | |
Images

Ries Woron

The Back Door
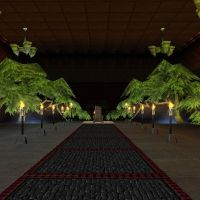
Throne Room
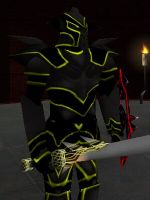
Armor of Darkness


Dialog
Opening Dialog
Trapped Townsperson
- Trapped Townsperson tells you, "Please get me out of here! You don't know what they do to us, it is terrible!"
- You open the lock with ease.
- Trapped Townsperson tells you, "Thank you for getting me out of that cell. I need to get out of here before they grab me again."
- You have been awarded the title "No Cage Can Hold Me"
Update History
|