Difference between revisions of "The Old Warehouse"
Jump to navigation
Jump to search
| (2 intermediate revisions by one other user not shown) | |||
| Line 1: | Line 1: | ||
| − | {{ | + | {{Verified|Quest=True}}{{Quest Summary |
| Level = 40 | Recommended Level = | | Level = 40 | Recommended Level = | ||
| Quest Type = Solo | | Quest Type = Solo | ||
| Line 5: | Line 5: | ||
| Starts At = 7.6N, 58.4E at [[South Rithwic Outpost]] | | Starts At = 7.6N, 58.4E at [[South Rithwic Outpost]] | ||
| Route = | | Route = | ||
| − | | Repeat Timer = | + | | Repeat Timer = 6 Days |
| Time to Complete = | | Time to Complete = | ||
| Contracts = | | Contracts = | ||
}} | }} | ||
== Overview == | == Overview == | ||
| + | * {{Differs Note}} The timer for the Letter to Celcynd is 6 days, rather than 20 hours. The timer for the town stamp is the correct 20 hours, but it's been moved to the ground next to the chest containing Brentsella's Key. | ||
| + | |||
Brentsella will tell you about her old home in the [[Old Warehouse]] to the north, she mentions that you can keep any treasures you find within if you decide to explore it. | Brentsella will tell you about her old home in the [[Old Warehouse]] to the north, she mentions that you can keep any treasures you find within if you decide to explore it. | ||
| − | + | The dungeon for this quest also contains a stamp that is used in the [[Exploration Society Letters]] quest to gain useful equipment. | |
If you have Lockpicking and can pick a chest with 220 difficulty, you can skip much of this quest. | If you have Lockpicking and can pick a chest with 220 difficulty, you can skip much of this quest. | ||
| Line 20: | Line 22: | ||
# Go right at the first split and down the ramp in the north room. | # Go right at the first split and down the ramp in the north room. | ||
# Hug the right wall to the second chest that contains {{Itemlink|Brentsella's Key}}. | # Hug the right wall to the second chest that contains {{Itemlink|Brentsella's Key}}. | ||
| − | # Head back to the split at the beginning and go south, unlock the chest with the key and take {{Itemlink|Letter to Celcynd (Brentsella)|Letter to Celcynd}} | + | # Optional: Use the {{Itemlink|Rithwic Town Stamp Cache}} on the ground nearby to obtain the {{Itemlink|Rithwic Town Stamp}}. |
| + | # Head back to the split at the beginning and go south, unlock the chest with the key and take {{Itemlink|Letter to Celcynd (Brentsella)|Letter to Celcynd}}. | ||
# Return the letter to [[Celcynd the Dour]] in [[Rithwic]] at 10.7N, 58.1E for {{Itemlink|Celcynd's Ring}}. | # Return the letter to [[Celcynd the Dour]] in [[Rithwic]] at 10.7N, 58.1E for {{Itemlink|Celcynd's Ring}}. | ||
# Take the ring to [[Brentsella]] at the [[South Rithwic Outpost]] or [[Mindorla]] at the [[East Rithwic Outpost]] for your rewards. | # Take the ring to [[Brentsella]] at the [[South Rithwic Outpost]] or [[Mindorla]] at the [[East Rithwic Outpost]] for your rewards. | ||
| Line 36: | Line 39: | ||
== Rewards == | == Rewards == | ||
{{Rewards Table | {{Rewards Table | ||
| − | | Quest Task = | + | | Quest Task = Give Celcynd's Ring to Brentsella or Mindorla |
| Item Reward = | | Item Reward = | ||
* {{Icon Link|Health Tonic}} (x2) | * {{Icon Link|Health Tonic}} (x2) | ||
* {{Icon Link|Mid-Stakes Gambling Token}} | * {{Icon Link|Mid-Stakes Gambling Token}} | ||
| − | | Max XP Reward = 4,500,000 | Percent of Level = 85 | | + | | Max XP Reward = 4,500,000 |
| − | + | | Percent of Level = 85 | |
| − | + | | Level Cap = 50 | |
}} | }} | ||
== Images == | == Images == | ||
| − | <gallery | + | <gallery> |
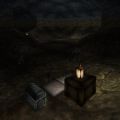
File:The Old Warehouse Live.jpg|The Old Warehouse | File:The Old Warehouse Live.jpg|The Old Warehouse | ||
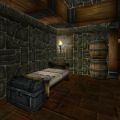
File:The Old Warehouse Live 2.jpg|Chest that contains Brentsella's Key | File:The Old Warehouse Live 2.jpg|Chest that contains Brentsella's Key | ||
Latest revision as of 14:56, 2 April 2024
| Verified This page has been verified to match the content available on Levistras. |
| Walkthrough & Notes Dungeons & Maps Rewards Images Dialog Update History |
| The Old Warehouse | |
|---|---|
| Required Level: | 40 |
| Type: | Solo |
| Starts With: | Brentsella |
| Starts At: | 7.6N, 58.4E at South Rithwic Outpost |
| Repeat: | 6 Days |
Overview
- Differs from Retail: The timer for the Letter to Celcynd is 6 days, rather than 20 hours. The timer for the town stamp is the correct 20 hours, but it's been moved to the ground next to the chest containing Brentsella's Key.
Brentsella will tell you about her old home in the Old Warehouse to the north, she mentions that you can keep any treasures you find within if you decide to explore it.
The dungeon for this quest also contains a stamp that is used in the Exploration Society Letters quest to gain useful equipment.
If you have Lockpicking and can pick a chest with 220 difficulty, you can skip much of this quest.
Walkthrough & Notes
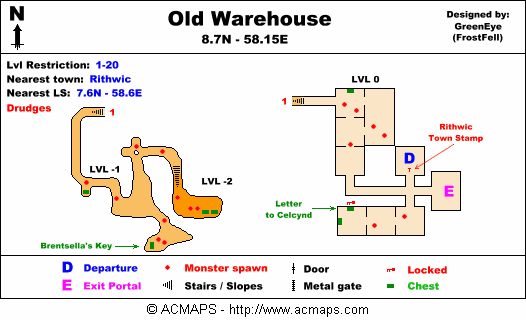
- Run to the Old Warehouse at 8.7N, 58.1E.
- Go right at the first split and down the ramp in the north room.
- Hug the right wall to the second chest that contains Brentsella's Key.
- Optional: Use the Rithwic Town Stamp Cache on the ground nearby to obtain the Rithwic Town Stamp.
- Head back to the split at the beginning and go south, unlock the chest with the key and take Letter to Celcynd.
- Return the letter to Celcynd the Dour in Rithwic at 10.7N, 58.1E for Celcynd's Ring.
- Take the ring to Brentsella at the South Rithwic Outpost or Mindorla at the East Rithwic Outpost for your rewards.
Dungeons & Maps
| Dungeon | Coordinates | Wiki Map | ACmaps |
|---|---|---|---|
| Old Warehouse | 8.7N, 58.1E | -- | 0165 |
Rewards
| Give Celcynd's Ring to Brentsella or Mindorla | |
|---|---|
| Experience: | 4,500,000 (85% up to level 50) |
| Items: | |
Images

The Old Warehouse
Chest that contains Brentsella's Key
Chest that contains Letter to Celcynd


Dialog
- Opening Dialog
- Brentsella tells you, "I used to try to live in a place called the Old Warehouse, a dungeon overrun with monsters now. It's on the hill to the north, toward town. If you go in, you can keep any treasure you find."
- Handing in Letter to Celcynd
- You give Celcynd the Dour Letter to Celcynd.
- Celcynd the Dour tells you, "Brentsella! Why? Oh, never mind. Here, you can have this instead. Take it before I change my mind."
- Celcynd the Dour gives you Celcynd's Ring.
- Showing Celcynd's Ring to Celcynd (he keeps it, no reward)
- You give Celcynd the Dour Celcynd's Ring.
- Celcynd the Dour tells you, "Well, I suppose I'll take that back. Thanks."
- Showing Celcynd's Ring to Brentsella
- You allow Brentsella to examine your Celcynd's Ring.
- Brentsella tells you, "Oh, memories. I didn't really want it back, but here, have this as a token of my thanks."
- You've earned 4,500,000 experience.
- Brentsella gives you Mid-Stakes Gambling Token.
- Brentsella gives you 2 Health Tonics.
- Showing Celcynd's Ring to Mindorla
- You give Mindorla Celcynd's Ring.
- Mindorla tells you, "Why that ungrateful...er, thank you for bringing this to me. Here is a small reward."
- You've earned 4,500,000 experience.
- Mindorla gives you Mid-Stakes Gambling Token.
- Mindorla gives you 2 Health Tonics.
- Attempting to turn in again before timer expires
- You allow Brentsella to examine your Celcynd's Ring.
- Brentsella tells you, "I grow tired of these love games. Maybe tomorrow I will have made up my mind."
- You give Mindorla Celcynd's Ring.
- Mindorla tells you, "You dare mock my pain when my wounds are fresh? Maybe if you come back tomorrow I will be able to deal with the matter."
Update History
|